How to Create Recurring Transactions in Apocha
This step-by-step guide walks you through creating your first recurring transactions in Apocha for automatic transaction tracking. In just 15 minutes, you'll set up automatic recording of your most common income and expenses, saving hours of manual data entry each month while gaining a clear forecast of your financial future.
Watch How It Works
Ready to get started? Sign up for a free Apocha account and follow along.
Start tracking your recurring transactionsBefore You Begin
Make sure you have:
- An active Apocha account with accounts set up and cashed up
- Your recurring payment information (amounts, dates and billing intervals, recipients)
- 15 minutes to set up your most important recurrent bills and payments
If you're new to the concept of recurring transactions, read our complete guide to understanding recurring transactions in Apocha to learn why automatic transaction tracking is crucial for your financial success.
How to Automatically Track Your Monthly Salary
Let's start with the most important recurring transaction: your income. This takes just 3 minutes to set up automatic salary tracking that will record your income every month without manual data entry.
Step 1: Create Your Income Receipt
Navigate to the Receipts section and click New receipt. You'll configure it as an income transaction with these details:
![]()
![]()
Set the cash flow type to Income and enter your monthly salary amount, for example $3,290.00. Select the account that receives your salary (like "Sarah" for a personal account), enter your employer's name like "Main Street Company" in our example, and choose "Employer" as the supplier type.
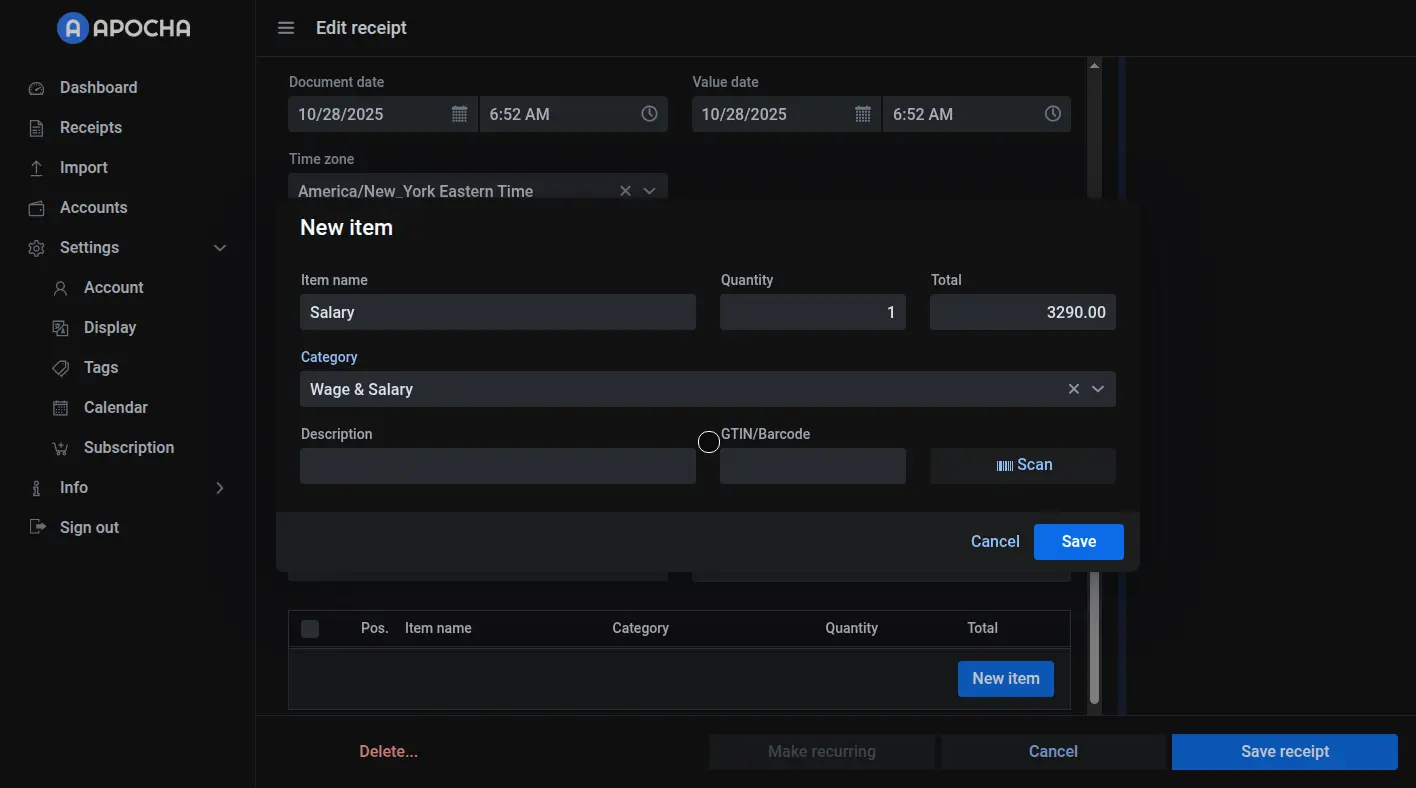
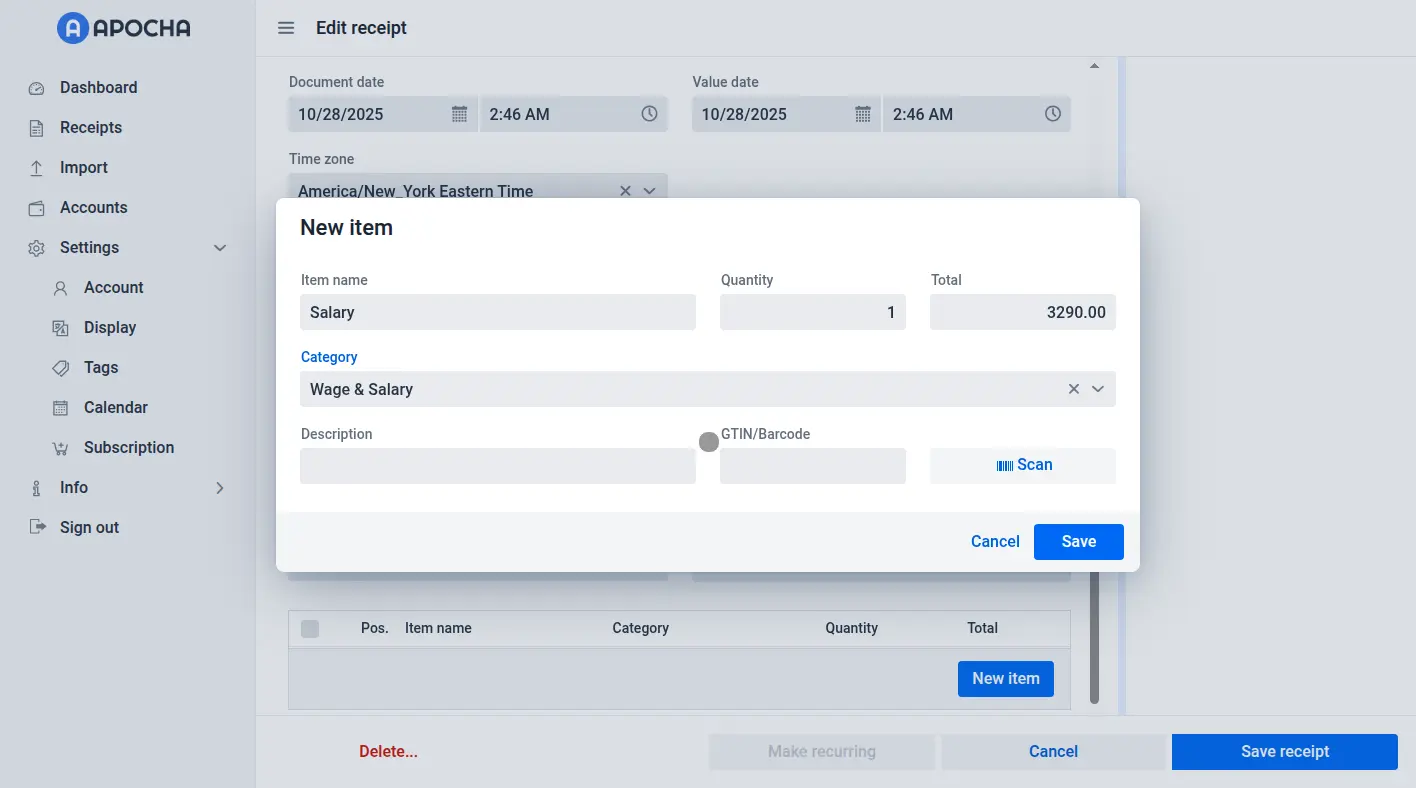
Step 2: Add the Line Item
Click the New item button to add details about this income. Name it "Salary" and select "Wage & Salary" as the category. The quantity is typically 1 for a monthly salary, and the total matches your income amount. If your income statement contains more items, add them too. Click Save to add this item to your receipt.
Step 3: Make It Recurring
Here's where we make a series out of an existing transaction or receipt. After saving your receipt, you'll see a Make recurring button. Click it to open the automation dialog.
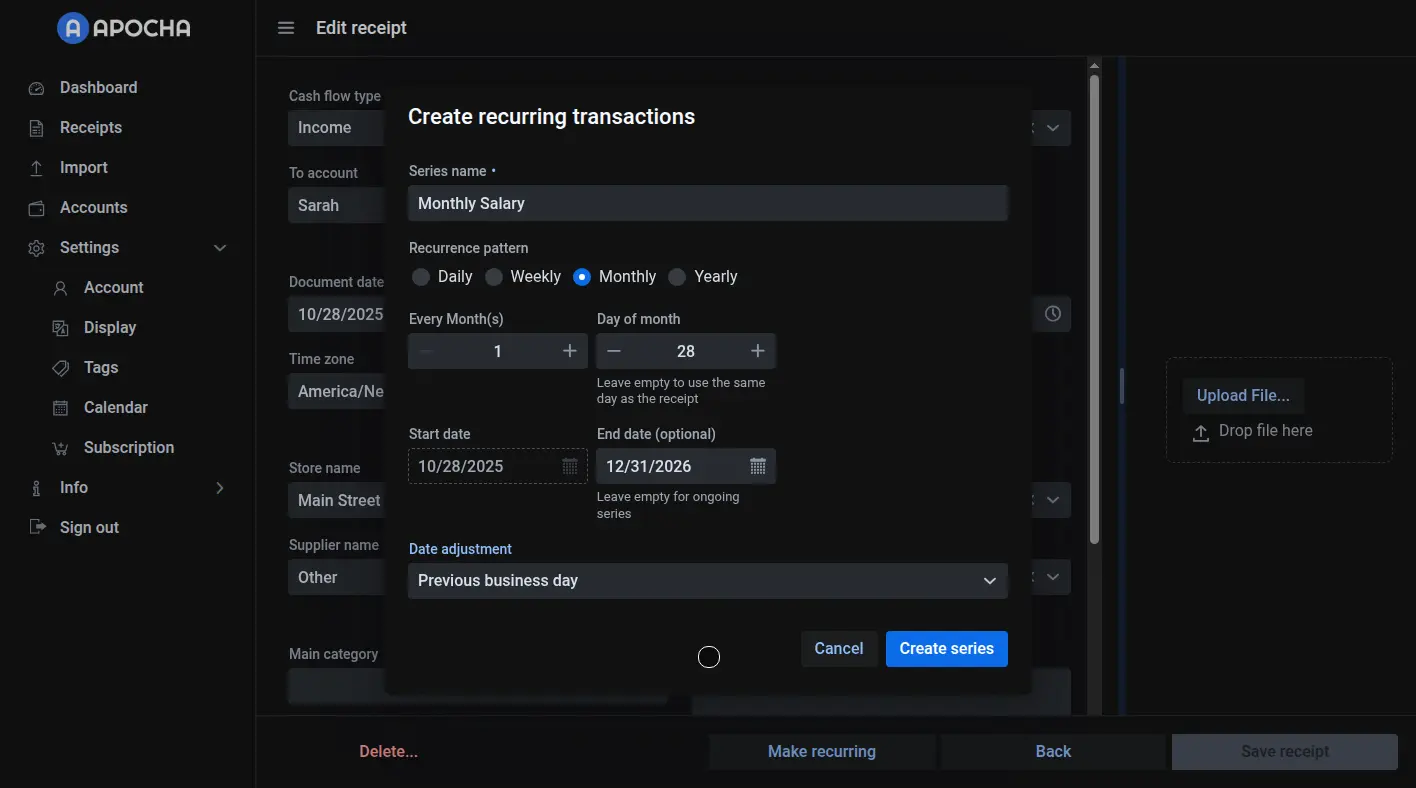
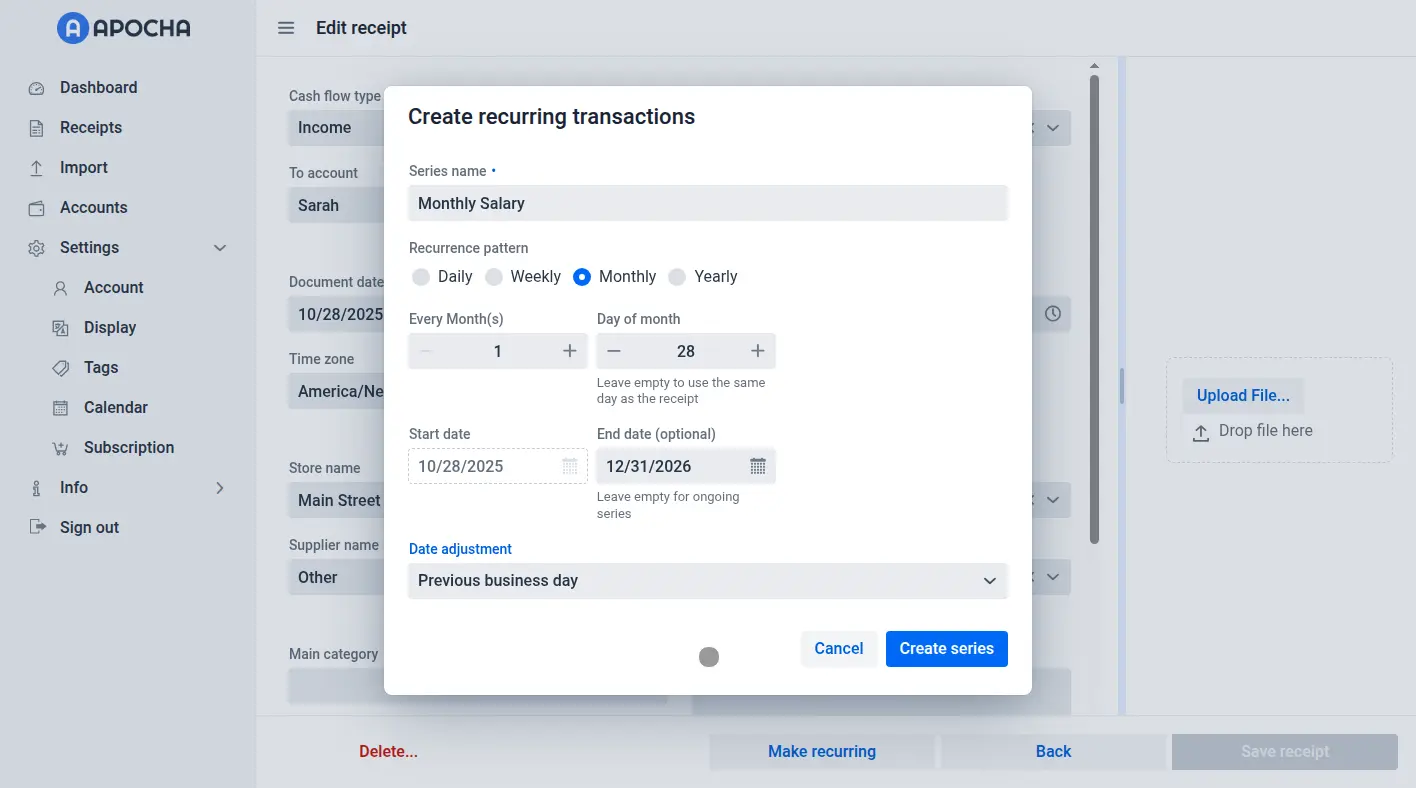
Give your series a clear name like "Monthly Salary" and select Monthly as the pattern. Choose the day you typically get paid, such as the 28th of each month. Set your start date and leave the end date empty for ongoing income.
Important: If your bank is not operating on weekends you can adjust the value day of your income payment. Select e.g. "Previous business day" as the date adjustment in case the normal due date is on a weekend or holiday and the payment arrives on the Friday before. This ensures that if payday falls on a weekend, Apocha will automatically record it correctly on Friday instead, matching how most employers handle payments.
Click Create series and you're done! Your salary will now appear automatically every month.
Track Your Fixed Expenses Automatically
Now let's set up automatic tracking for your regular bills and expenses. We'll use rent as an example, but the same process works for any recurring expense like subscriptions, utilities, or insurance payments. Don't forget to track bills you pay quarterly or annually for complete financial forecasting. The process is similar to tracking income, except we now select Expense as the cash flow type.
Track Monthly Rent Payments Automatically
Create a new receipt and select Expense as the cash flow type. Enter your rent amount (for example, $985.00) and select the account you pay from. Add your landlord or property management company as the store name, like "ACME Real Estate," and choose "Rent" or "Housing" as the category.
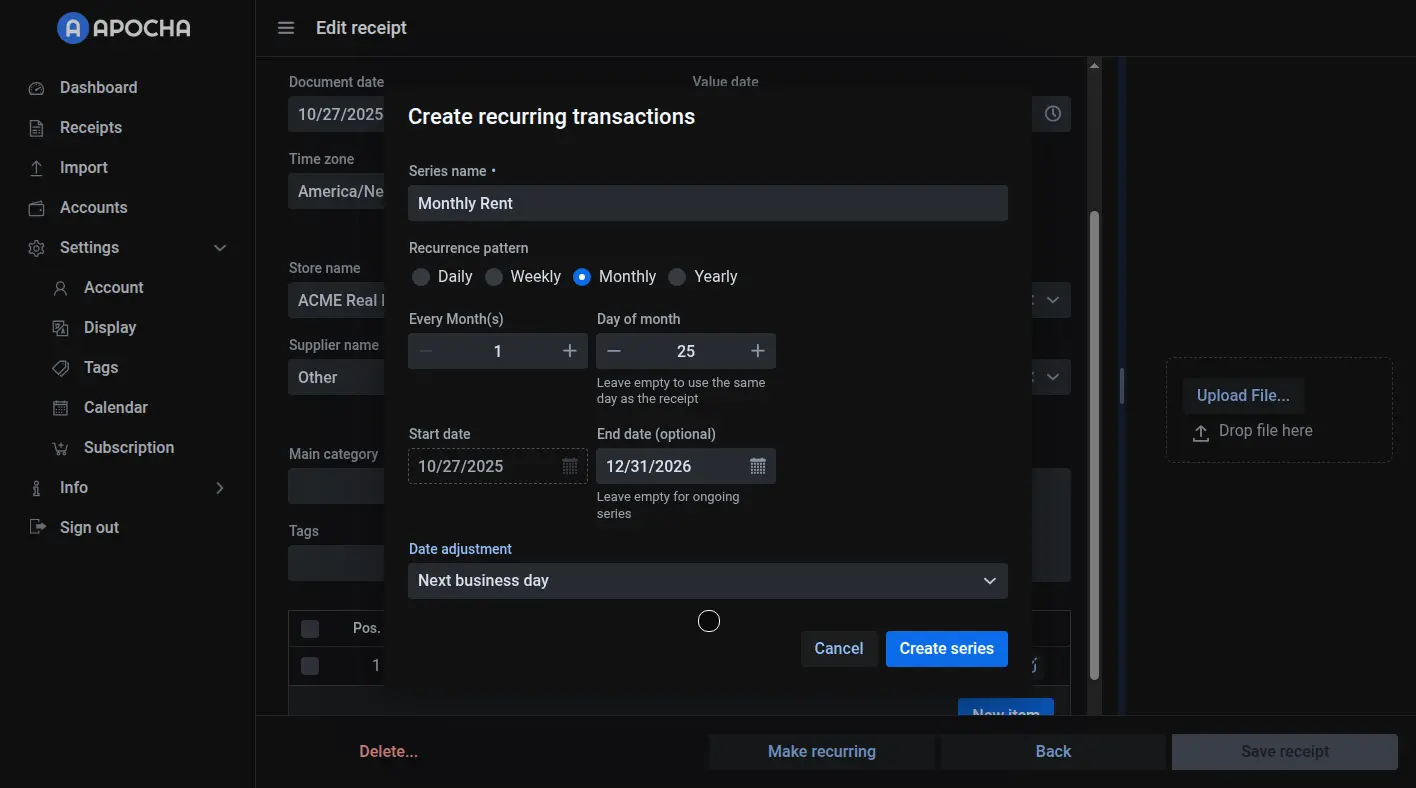
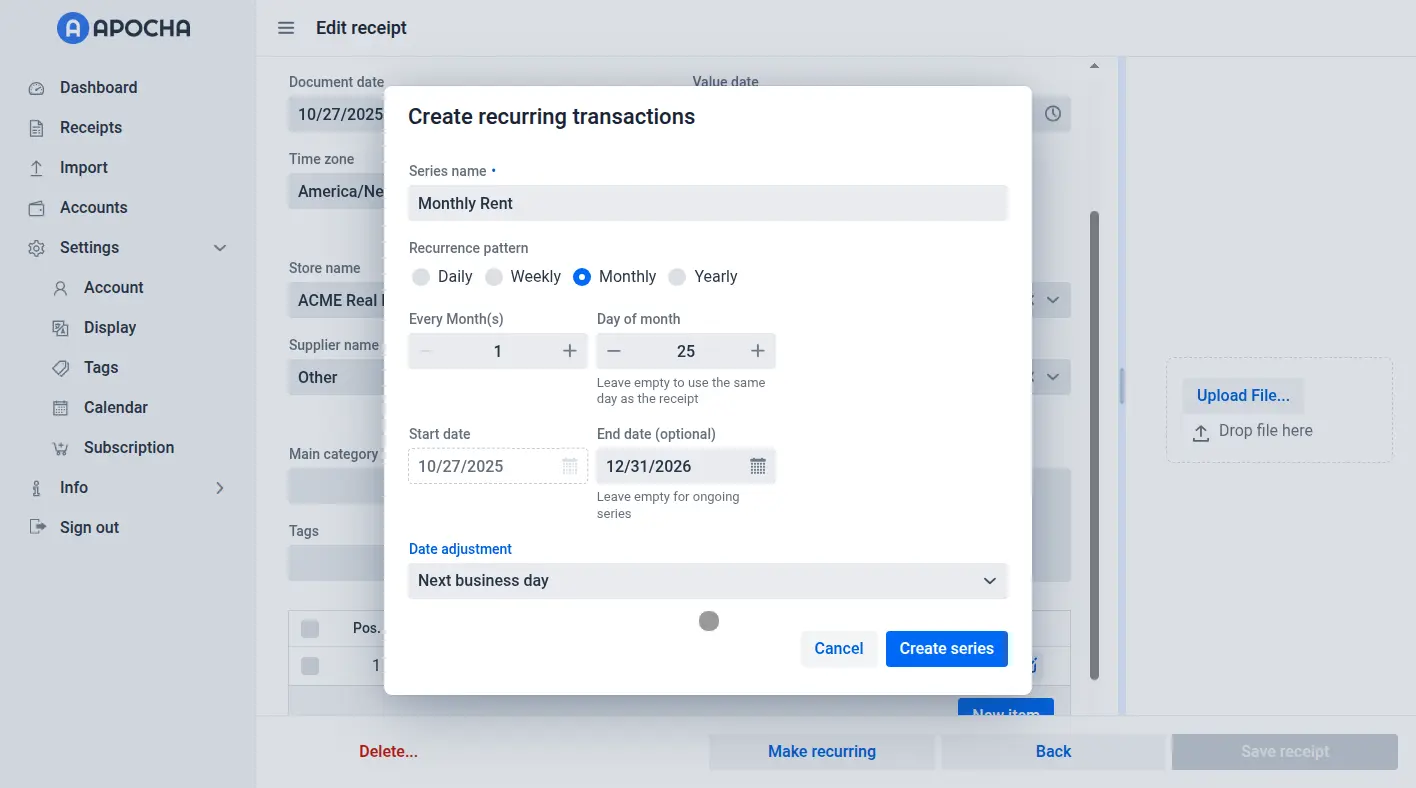
After saving the receipt, click Make recurring and configure it as a monthly payment on your rent due date, e.g. the 25th of the month. This time, you can select "Next business day" as the date adjustment so that weekend due dates automatically move to Monday.
Common Recurring Expenses
Once you've mastered rent, apply the same process to your other regular bills:
Internet and Utilities Track your internet service automatically ($69.99/month) and set up automatic expense recording for your electricity bill the same way. For variable utilities like power or water bills, use an average amount for financial forecasting and adjust individual transactions when the actual bill arrives. This way of tracking your bills still saves you 90% of the manual data entry work while maintaining accurate records.
Subscriptions and Services Set up automatic tracking for your phone plan, streaming services like Netflix or Spotify, and gym membership expenses. These recurring subscription payments typically have fixed amounts and predictable billing dates, making them perfect for automated financial record keeping. Many subscription services send digital invoices that you can automatically import via email. After setting up subscription tracking for all your services, it's a good time to review them and cancel any you no longer use. Start saving money immediately! In the guide on managing recurring transactions we'll show you how to set end dates for cancelled subscriptions.
Insurance Payments Whether you pay monthly for health insurance or quarterly for car insurance, set these up as recurring transactions. For quarterly payments, simply choose "Every 3 months" as the pattern instead of monthly.
Viewing Your Results
Once you've set up your recurring transactions, Apocha's dashboard transforms into a powerful forecasting tool.
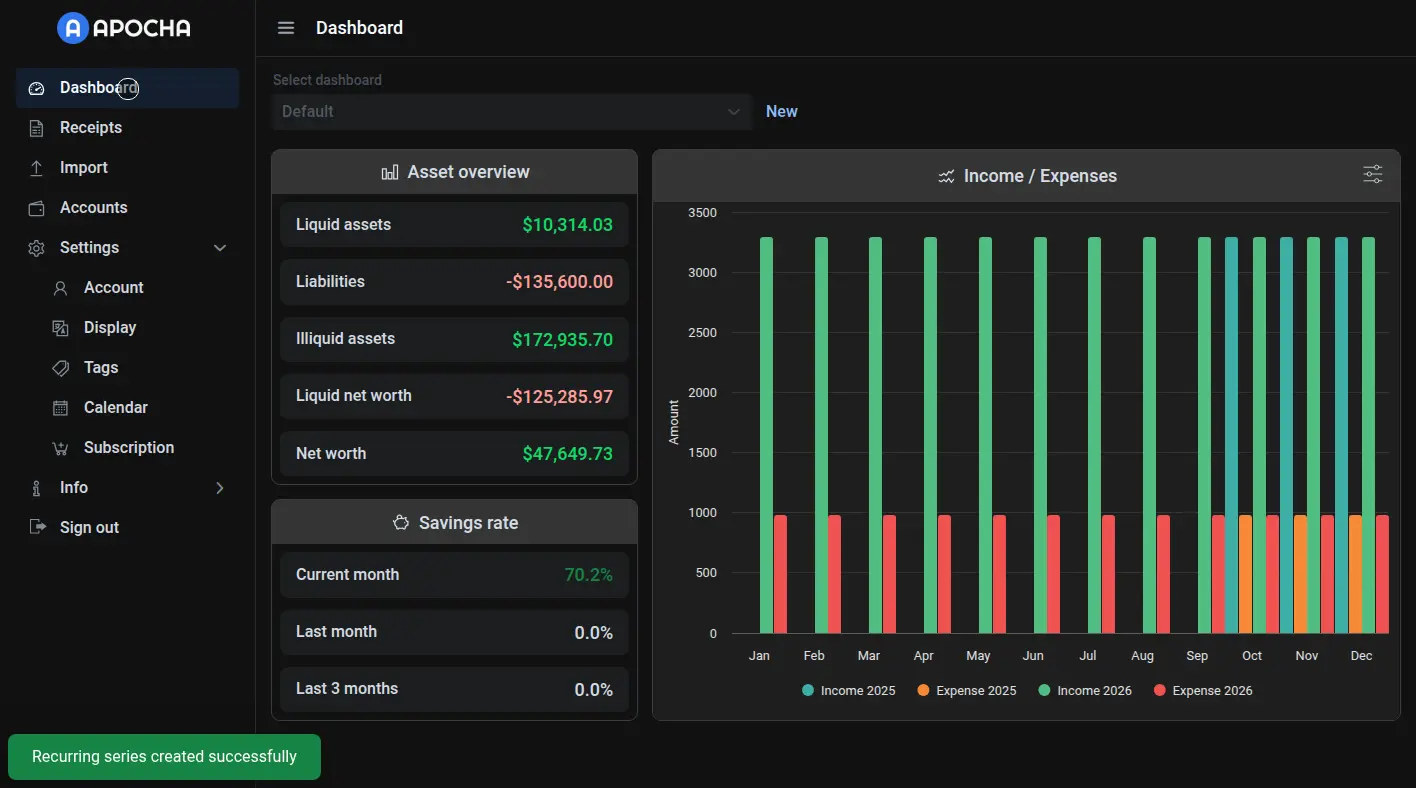

The income and expense chart shows green bars for all your expected income and red bars for your fixed expenses. Your savings rate calculates automatically, giving you instant insight into your financial health. Add a Savings Rate widget to your dashboard to track your progress over time.
Best Practices for Creating Recurring Transactions
Start with the Big Five
- Primary income sources (salary or main client payment)
- Housing costs (rent or mortgage)
- Essential utilities (electricity, internet, phone)
- Insurance payments (health, auto, home)
- Subscriptions (streaming services, gym memberships)
These typically represent more than 80% of your recurring financial activity.
Naming Conventions Matter
Use descriptive names that will make sense months from now:
- Good: "Monthly Salary - ABC Corp"
- Better: "Bi-weekly Salary - ABC Corp Marketing"
- Avoid: "Income" or "Payment"
Frequently Asked Questions
What if I need to skip a payment?
When a recurring transaction appears in your receipt list, you can edit or delete just that single occurrence. The series continues unchanged for future months. This is perfect for pausing subscriptions or handling irregular situations.
How do I handle variable amounts like electricity bills?
Set up the recurring transaction with your average monthly amount. This is for forecasting your expenses in the future. When the actual bill arrives, simply edit that month's transaction to reflect the real amount. You still save 90% of the data entry work while maintaining accuracy and forecasting.
Can I set up bi-weekly paychecks?
Yes! When creating your recurring series, select "Weekly" as the pattern and set it to recur every 2 weeks. This works perfectly for bi-weekly salaries, loan payments, or any other two-week cycle.
What about annual payments?
Choose "Yearly" as the recurrence pattern and set the renewal date. Apocha will automatically create the transaction once per year, giving you plenty of notice before large annual expenses like insurance premiums or membership renewals.
How much time does automatic transaction tracking save?
Most users save 2-3 hours per month on manual data entry. With 20-30 recurring transactions, you eliminate entering approximately 240-360 transactions per year manually. The time saved increases as you add more automatic tracking for bills, subscriptions, and regular income.
Can I import recurring transactions from other finance apps?
Currently, you'll need to set up recurring transactions manually in Apocha. However, this one-time setup (about 15 minutes) provides long-term automation. Once configured, your transactions track automatically forever, making the initial setup worthwhile.
How do I set up recurring transactions for freelance income?
For irregular freelance income, create separate recurring transactions for each regular client. If payment amounts vary, use average amounts for forecasting and adjust individual transactions when payments arrive. This helps predict cash flow while maintaining flexibility.
What's the difference between transaction automation and tracking?
Apocha automates the tracking and recording of your transactions - it automatically creates transaction records on scheduled dates. This is different from payment automation, which would actually process payments through your bank. Apocha helps you track and forecast, not execute payments.
Common Issues and Solutions
Transaction Didn't Appear on Expected Date
Check the date adjustment settings. If set to "Previous business day" and the date falls on a Monday holiday, the transaction may appear on the previous Friday. Adjust the recurrence settings if needed.
Duplicate Transactions Created
This usually happens when you accidentally create two recurring series for the same expense. Review your recurring transactions list and delete any duplicate series. Keep only one series per recurring expense or income source.
Your Quick Start Checklist
Ready to set up automatic transaction tracking? Follow this checklist:
- Set up your primary income source tracking (3 minutes)
- Track your rent or mortgage payment automatically (2 minutes)
- Configure automatic tracking for utilities (5 minutes)
- Add subscription expense tracking (5 minutes)
- Review your financial forecast dashboard (1 minute)
Total time: 15 minutes for a lifetime of automated financial tracking.
Next Steps
Now that you've created your recurring transactions, you'll want to:
-
Learn to manage them: As life changes, so will your recurring transactions. Read our guide on how to manage and edit recurring transactions in Apocha.
-
Sync with your calendar: Never miss tracking a payment by integrating Apocha with Google Calendar, Outlook, and Apple Calendar to see all upcoming transactions in your favorite calendar app and get reminders before bills are due.
-
Optimize your categories: Ensure your recurring transactions use consistent categories for better reporting and analysis.
Ready to continue? Learn how to manage and edit your recurring transactions →
Need context? Go back to understand why recurring transactions matter ←